Description
"EZVAULTPLS - 8 Channel Wi-Fi Network Video Recorder - Storage and Advanced Confiruration Options Only - No HDMI Access - Live View From EZVIZ APP or EZVIZ Studio
Save more video with EZVIZ Vault Plus, which records 24/7 footage from up to 8 EZVIZ Wi-Fi cameras at the same time. Featuring a dedicated extended-range Wi-Fi network, Vault Plus connects all of your EZVIZ Wi-Fi cameras and begins recording and storing video from each device using password-protected AES encryption. Even with videos saved to local storage, you can access and watch them anywhere you have internet through the EZVIZ APP.
WI-Fi Relay
Place the Vault Plus in a central location between all of your EZVIZ cameras for the most reliable connection and then connect the Vault Plus to your home router through Wi-Fi.
Advanced Configuration Options and Motion Detetion Zones
Once Vault Plus is setup to your network, open a browser on a device connected to your home network and enter the IP Address listed in the Quick Start Guide to access these options.
Compatibility
Mix and Match up to 8 EZVIZ Wi-Fi Cameras, indoor and outdoor.
*Mini Trooper currently not supported
Connecting your NVR to your Home Network through Wi-Fi (Wi-Fi Relay)
(1) Power up the Vault Plus. Connect the power cord to the Vault Plus and plugin the power supply to a power outlet. Wait for 2 minutes to complete the system start-up.
(2) Connect a PC or mobile device to the Vault Plus Wi-Fi network (named as ‘ezviz_xxxxxx’) to access the Vault Plus user interface. You also can find Vault Plus Wi-Fi network name (SSID) on device bottom label.
(3) If the Vault Plus user interface did not automatically pop-up, open an internet browser (IE8/higher or Chrome) and enter IP Address listed in the Quick Start Guide to access the Vault Plus user interface.
(4) Click “Start” button then follow the steps to setup the Vault Plus Internet settings.
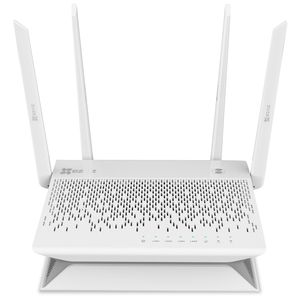
EZVIZ Vault Plus 8 Channel Wi-Fi Network Video Recorder, 24/7 Recording on 1TB Hard Drive, Motion Detection Zones, Mix and Match with EZVIZ Wi-Fi Cameras
Price is below average
Current Price
$129.99
Average
$216.47
Min Price
$114.99
Max Price
$449.9
Price dynamics
40%
Description
"EZVAULTPLS - 8 Channel Wi-Fi Network Video Recorder - Storage and Advanced Confiruration Options Only - No HDMI Access - Live View From EZVIZ APP or EZVIZ Studio
Save more video with EZVIZ Vault Plus, which records 24/7 footage from up to 8 EZVIZ Wi-Fi cameras at the same time. Featuring a dedicated extended-range Wi-Fi network, Vault Plus connects all of your EZVIZ Wi-Fi cameras and begins recording and storing video from each device using password-protected AES encryption. Even with videos saved to local storage, you can access and watch them anywhere you have internet through the EZVIZ APP.
WI-Fi Relay
Place the Vault Plus in a central location between all of your EZVIZ cameras for the most reliable connection and then connect the Vault Plus to your home router through Wi-Fi.
Advanced Configuration Options and Motion Detetion Zones
Once Vault Plus is setup to your network, open a browser on a device connected to your home network and enter the IP Address listed in the Quick Start Guide to access these options.
Compatibility
Mix and Match up to 8 EZVIZ Wi-Fi Cameras, indoor and outdoor.
*Mini Trooper currently not supported
Connecting your NVR to your Home Network through Wi-Fi (Wi-Fi Relay)
(1) Power up the Vault Plus. Connect the power cord to the Vault Plus and plugin the power supply to a power outlet. Wait for 2 minutes to complete the system start-up.
(2) Connect a PC or mobile device to the Vault Plus Wi-Fi network (named as ‘ezviz_xxxxxx’) to access the Vault Plus user interface. You also can find Vault Plus Wi-Fi network name (SSID) on device bottom label.
(3) If the Vault Plus user interface did not automatically pop-up, open an internet browser (IE8/higher or Chrome) and enter IP Address listed in the Quick Start Guide to access the Vault Plus user interface.
(4) Click “Start” button then follow the steps to setup the Vault Plus Internet settings.
Save more video with EZVIZ Vault Plus, which records 24/7 footage from up to 8 EZVIZ Wi-Fi cameras at the same time. Featuring a dedicated extended-range Wi-Fi network, Vault Plus connects all of your EZVIZ Wi-Fi cameras and begins recording and storing video from each device using password-protected AES encryption. Even with videos saved to local storage, you can access and watch them anywhere you have internet through the EZVIZ APP.
WI-Fi Relay
Place the Vault Plus in a central location between all of your EZVIZ cameras for the most reliable connection and then connect the Vault Plus to your home router through Wi-Fi.
Advanced Configuration Options and Motion Detetion Zones
Once Vault Plus is setup to your network, open a browser on a device connected to your home network and enter the IP Address listed in the Quick Start Guide to access these options.
Compatibility
Mix and Match up to 8 EZVIZ Wi-Fi Cameras, indoor and outdoor.
*Mini Trooper currently not supported
Connecting your NVR to your Home Network through Wi-Fi (Wi-Fi Relay)
(1) Power up the Vault Plus. Connect the power cord to the Vault Plus and plugin the power supply to a power outlet. Wait for 2 minutes to complete the system start-up.
(2) Connect a PC or mobile device to the Vault Plus Wi-Fi network (named as ‘ezviz_xxxxxx’) to access the Vault Plus user interface. You also can find Vault Plus Wi-Fi network name (SSID) on device bottom label.
(3) If the Vault Plus user interface did not automatically pop-up, open an internet browser (IE8/higher or Chrome) and enter IP Address listed in the Quick Start Guide to access the Vault Plus user interface.
(4) Click “Start” button then follow the steps to setup the Vault Plus Internet settings.
Price will be lower
in next 2 weeks
in next 2 weeks
According to the data, price will be lower in next two weeks, so not waste your money and track better price!
Similar products
