Description
Calming the Vortex: Tube reservoirs are often plagued with either a vortex issue or a noise issue because of today's high flow systems. Complex anti-vortex paddles or walls have been designed to help reduce the vortex, however even with this slight obstruction the flow is decreased. The simplicity of the ZenCoil results in the calming effect desired with even less obstruction of flow. Achieving Zen: A wide variety of colors with simple and straight forward installation will get your system to Zen in no time. First, access the inside of your tube reservoir. Install Notes: Twist the coil to make the outside of the coil smaller than the inside of your tube reservoir. Insert the end of the coil into your reservoir and continue to twist the coil until it reaches the bottom of the reservoir. Once the coil reaches the bottom, release the coil and it will press firmly up against the side of your reservoir. Next, twist the coil inside the tube reservoir until a 1/2in. space is between each level of the coil. (For example: A 240mm long reservoir will need approximately 6in. of coil to deliver proper fluid transfer. (Results of In House Testing)). Finally, cut any excess of the coil that remains outside the reservoir.
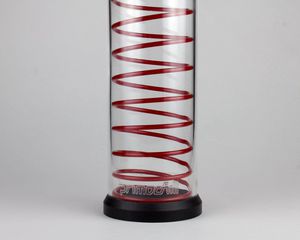
PRIMOCHILL ZenCoils Tube Reservoir Calming Coil - Red
Current Price
$5.99
Average
$5.99
Min Price
$5.99
Max Price
$5.99
Description
Calming the Vortex: Tube reservoirs are often plagued with either a vortex issue or a noise issue because of today's high flow systems. Complex anti-vortex paddles or walls have been designed to help reduce the vortex, however even with this slight obstruction the flow is decreased. The simplicity of the ZenCoil results in the calming effect desired with even less obstruction of flow. Achieving Zen: A wide variety of colors with simple and straight forward installation will get your system to Zen in no time. First, access the inside of your tube reservoir. Install Notes: Twist the coil to make the outside of the coil smaller than the inside of your tube reservoir. Insert the end of the coil into your reservoir and continue to twist the coil until it reaches the bottom of the reservoir. Once the coil reaches the bottom, release the coil and it will press firmly up against the side of your reservoir. Next, twist the coil inside the tube reservoir until a 1/2in. space is between each level of the coil. (For example: A 240mm long reservoir will need approximately 6in. of coil to deliver proper fluid transfer. (Results of In House Testing)). Finally, cut any excess of the coil that remains outside the reservoir.
Price will be lower
in next 2 weeks
in next 2 weeks
According to the data, price will be lower in next two weeks, so not waste your money and track better price!
Product review & video
primo chill zen coils this is a pack of one zinfoil this would be the black one and this would be the red of course i got red and black for the frank build but they do make them in multiple other colors and the purpose of these are calming coils they are to calm the water going into your reservoir as that water starts pumping in through the top it creates all kinds of turbulence through your reservoirs and what these coils are designed to do is to be able to give a surface along the edge to break all that turbulence up and keep that water from just being so active within your reservoir and it truly calms that water down that's why they're called zen coils is to break up a lot of the air bubbles and that kind of thing so whenever it comes out of the bottom if you're routing your stuff out the bottom everything is going to be calm and it's going to have a reduced amount of air within that


Similar products
