Description
Parameters:
Input Voltage: DC 4~40V(the input voltage should be higher than output voltage at least 1V)
Output Voltage: DC 1.25~37V(continuously adjustable)
Output Current: 2A(for stable operation), 3A max.
Voltmeter: 0~40V
Voltmeter Accuracy: .+/-0.1V
Internal Oscillation Frequency: 150KHz
There is a large area of copper on its back to enhance heat dissipation
How to adjust accuracy of input/output volt?
(1)Output voltage calibration
Firstly, adjust the right button so that "OUT" LED lighted, the voltmeter shows the value of output voltage; Press the right button for more than 2 seconds,
release, voltmeter and "OUT" LED flashes in synchronization so that you enter the output voltage calibration mode.
Secondly, press the right button (normal speed), the voltage value is adding up a unit; Press the left button, minus a unit; Due to a unit is less than 0.1V,
the minimum voltage display to 0.1V, so you need to continuously press 1-5 times to see the voltmeter change 0.1V, how many times voltmeter change 0.1V by pressing the key, depending on the current display voltage, the higher the voltage, the fewer the number of press.
Thirdly, press the right button for more than 2 seconds, release, to exit the output voltage calibration mode. All parameters set to automatically power down to save.
(2) Input voltage calibration
Firstly, adjust the right button so that "IN" LED lighted, the voltmeter shows the value of input voltage; press the right button for more than 2 seconds,
release, voltmeter and "IN" LED flashes in synchronization so that you enter the input voltage calibration mode.
Steps 2 and step 3 are consistent with the output voltage calibration method.
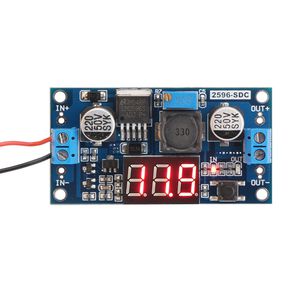
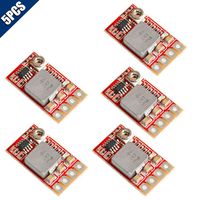
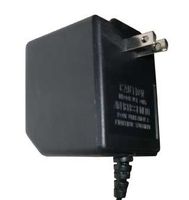
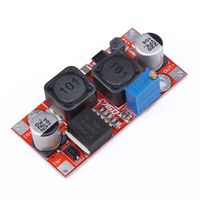
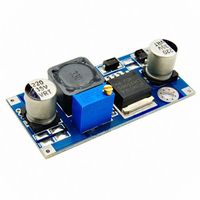
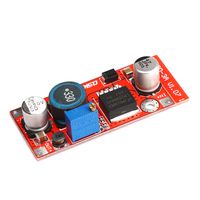
24v to 12v Step Down Converter, DROK LM2596 Analog Control Buck Transformer DC-DC Voltage Reducer Regulator Module 36V 24V 12V to 5V 2A Power Inverter Volt Stabilizer with Red LED Display Voltmeter
Current Price
$8.99
Average
$7.38
Min Price
$5.14
Max Price
$11.89
Price dynamics
18%
Description
Parameters:
Input Voltage: DC 4~40V(the input voltage should be higher than output voltage at least 1V)
Output Voltage: DC 1.25~37V(continuously adjustable)
Output Current: 2A(for stable operation), 3A max.
Voltmeter: 0~40V
Voltmeter Accuracy: .+/-0.1V
Internal Oscillation Frequency: 150KHz
There is a large area of copper on its back to enhance heat dissipation
How to adjust accuracy of input/output volt?
(1)Output voltage calibration
Firstly, adjust the right button so that "OUT" LED lighted, the voltmeter shows the value of output voltage; Press the right button for more than 2 seconds,
release, voltmeter and "OUT" LED flashes in synchronization so that you enter the output voltage calibration mode.
Secondly, press the right button (normal speed), the voltage value is adding up a unit; Press the left button, minus a unit; Due to a unit is less than 0.1V,
the minimum voltage display to 0.1V, so you need to continuously press 1-5 times to see the voltmeter change 0.1V, how many times voltmeter change 0.1V by pressing the key, depending on the current display voltage, the higher the voltage, the fewer the number of press.
Thirdly, press the right button for more than 2 seconds, release, to exit the output voltage calibration mode. All parameters set to automatically power down to save.
(2) Input voltage calibration
Firstly, adjust the right button so that "IN" LED lighted, the voltmeter shows the value of input voltage; press the right button for more than 2 seconds,
release, voltmeter and "IN" LED flashes in synchronization so that you enter the input voltage calibration mode.
Steps 2 and step 3 are consistent with the output voltage calibration method.
Input Voltage: DC 4~40V(the input voltage should be higher than output voltage at least 1V)
Output Voltage: DC 1.25~37V(continuously adjustable)
Output Current: 2A(for stable operation), 3A max.
Voltmeter: 0~40V
Voltmeter Accuracy: .+/-0.1V
Internal Oscillation Frequency: 150KHz
There is a large area of copper on its back to enhance heat dissipation
How to adjust accuracy of input/output volt?
(1)Output voltage calibration
Firstly, adjust the right button so that "OUT" LED lighted, the voltmeter shows the value of output voltage; Press the right button for more than 2 seconds,
release, voltmeter and "OUT" LED flashes in synchronization so that you enter the output voltage calibration mode.
Secondly, press the right button (normal speed), the voltage value is adding up a unit; Press the left button, minus a unit; Due to a unit is less than 0.1V,
the minimum voltage display to 0.1V, so you need to continuously press 1-5 times to see the voltmeter change 0.1V, how many times voltmeter change 0.1V by pressing the key, depending on the current display voltage, the higher the voltage, the fewer the number of press.
Thirdly, press the right button for more than 2 seconds, release, to exit the output voltage calibration mode. All parameters set to automatically power down to save.
(2) Input voltage calibration
Firstly, adjust the right button so that "IN" LED lighted, the voltmeter shows the value of input voltage; press the right button for more than 2 seconds,
release, voltmeter and "IN" LED flashes in synchronization so that you enter the input voltage calibration mode.
Steps 2 and step 3 are consistent with the output voltage calibration method.
Price will be lower
in next 2 weeks
in next 2 weeks
According to the data, price will be lower in next two weeks, so not waste your money and track better price!
Product review & video
this is the d-roc burger the reason I picked this up was to use my lipo battery to supply 12-volt DC current to a receiver that I wanted to use on a remote monitoring station and this so this little guy takes 12 volts well I didn't have any short power and I thought well how can I use but these guys our minimum 14.8 volt so that's where this guy comes in your buck converter will require a little bit of assembly it comes with a couple of standoffs eight screws and a pretty good quality Plexiglas with good ventilation I created a small wire harness to support the lipo xt60 connector and a jst connector which I'll hook up to my receiver you could create any wire harness you needed using the potentiometers it's really easy to adjust the voltage counterclockwise brings down the voltage clockwise brings up the mole teach I think they call this stepping up and stepping down I'm putting it at e


