Description
This is similar to another 16x2 character LCDs Shield that you've seen before, but with one vibrant difference: The backlight is actually an RGB LED. This means that you can change the backlight of this display to any color you want by controlling the three backlight levels. Very handy when you want to have some ambient information conveyed.
So we developed the LCD shield that lets you control a 16x2 Character LCD, up to 3 backlight pins AND 5 keypad pins using only the I2C bus on the Arduino! For connecting to I2C bus we used the I/O expander MCP23017. For of/on backlight used pin D9.
Also for more interacrtive of interface, we added the Buzzer. Now except the output of text information, you can also output a sound signal. Buzzer conected to pin D3.
Shield using only I/O D3, D9, SDA, SCL. All other pins free.
This shield is designed for 'classic' Arduinos such as the Uno, Duemilanove, Diecimilla, etc. and uses the I2C pins on Analog 4 and Analog 5. It will also work perfectly with Arduino Mega R3's. For using with Mega R3, need cut off line to A4, A5 on bottom side.
5 control buttons have height of 10mm, and have a height the same as the screen. This is convenient if you embed your project in box.
The has kit includes female pinheaders, for connecting external modules to the shield. We did't solder these pinheaders, it's convenient if you insert your project into the box.
For Arduino IDE, pls use lib: RGBLCDShield.
Product official page:
https://robotdyn.com/lcd-rgb-16x2-keypad-buzzer-shield-for-arduino.html
RobotDyn(R) - registered trademark in USA
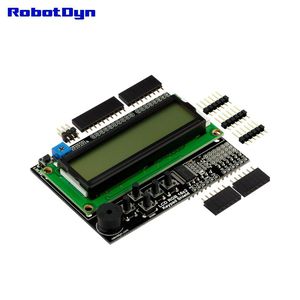
RobotDyn - LCD RGB 16x2 + keypad +Buzzer Shield for Arduino, I2C/IIC Interface, LCD RGB 1602
Current Price
$19.9
Average
$17.77
Min Price
$16.45
Max Price
$19.9
Price dynamics
11%
Description
This is similar to another 16x2 character LCDs Shield that you've seen before, but with one vibrant difference: The backlight is actually an RGB LED. This means that you can change the backlight of this display to any color you want by controlling the three backlight levels. Very handy when you want to have some ambient information conveyed.
So we developed the LCD shield that lets you control a 16x2 Character LCD, up to 3 backlight pins AND 5 keypad pins using only the I2C bus on the Arduino! For connecting to I2C bus we used the I/O expander MCP23017. For of/on backlight used pin D9.
Also for more interacrtive of interface, we added the Buzzer. Now except the output of text information, you can also output a sound signal. Buzzer conected to pin D3.
Shield using only I/O D3, D9, SDA, SCL. All other pins free.
This shield is designed for 'classic' Arduinos such as the Uno, Duemilanove, Diecimilla, etc. and uses the I2C pins on Analog 4 and Analog 5. It will also work perfectly with Arduino Mega R3's. For using with Mega R3, need cut off line to A4, A5 on bottom side.
5 control buttons have height of 10mm, and have a height the same as the screen. This is convenient if you embed your project in box.
The has kit includes female pinheaders, for connecting external modules to the shield. We did't solder these pinheaders, it's convenient if you insert your project into the box.
For Arduino IDE, pls use lib: RGBLCDShield.
Product official page:
https://robotdyn.com/lcd-rgb-16x2-keypad-buzzer-shield-for-arduino.html
RobotDyn(R) - registered trademark in USA
So we developed the LCD shield that lets you control a 16x2 Character LCD, up to 3 backlight pins AND 5 keypad pins using only the I2C bus on the Arduino! For connecting to I2C bus we used the I/O expander MCP23017. For of/on backlight used pin D9.
Also for more interacrtive of interface, we added the Buzzer. Now except the output of text information, you can also output a sound signal. Buzzer conected to pin D3.
Shield using only I/O D3, D9, SDA, SCL. All other pins free.
This shield is designed for 'classic' Arduinos such as the Uno, Duemilanove, Diecimilla, etc. and uses the I2C pins on Analog 4 and Analog 5. It will also work perfectly with Arduino Mega R3's. For using with Mega R3, need cut off line to A4, A5 on bottom side.
5 control buttons have height of 10mm, and have a height the same as the screen. This is convenient if you embed your project in box.
The has kit includes female pinheaders, for connecting external modules to the shield. We did't solder these pinheaders, it's convenient if you insert your project into the box.
For Arduino IDE, pls use lib: RGBLCDShield.
Product official page:
https://robotdyn.com/lcd-rgb-16x2-keypad-buzzer-shield-for-arduino.html
RobotDyn(R) - registered trademark in USA
Price will be lower
in next 2 weeks
in next 2 weeks
According to the data, price will be lower in next two weeks, so not waste your money and track better price!
Product review & video
Hi, Welcome to Robojax. My name is Ahmd Shamshiri from Canada. In this video
we are going to see how we can use this 1602 LCD which has 16 characters and 2
rows with I2C module using these four wires only. So we can print
text. The code for this project will be available by clicking at the link at the
description you can get it or you can go directly visiting www.robojax.com/learn/arduino so let's get started Hardware Explained so the module does display liquid
crystal display or LCD has 16 characters by 2. So 16 characters in two lines so we
have 1 2 3 up to 16 and then another 16 so that's why it's called 1602 so 16 and
then 2 and this has tons of wires to connect if we don't use the i2c module.
So this modulus is specifically designed for this one. So this module
has 4 pins . because I2C can work with the 2 wires. So we have VCC and then
we have a ground and then we have SDA and the


Similar products