Description
Requirements Before connecting the camera to the network
For Yourself:
You should know how to set your WiFi name (SSID) and password in your router settings.
For the Network:
1. If your router provides dual band WiFi, please make the name of 5Ghz WiFi different from that of 2.4Ghz WiFi
2. The 2.4Ghz WiFi name and password should not contain special character
3. The 2.4Ghz WiFi name should not be hidden
For the Camera:
1. It needs to be plugged in to work
2. It should be installed within WiFi distance to avoid connecting issues or unsmooth image
Steps to connect it to the network:
1. Make your WiFi meets the requirements above and the camera installed within WiFi distance
2. Power on the camera. Put the pin into the reset hole. Long press it for seconds until the camera makes a short beep. The red indicator will blink
3. Connect your phone to the 2.4Ghz band WiFi. Download the specified App. Sign up by an email address and log in
4. Click + then choose "Smart wireless mode". If the red indicator on the camera is blinking, tap "Next"
5. Enter the password for the 2.4Ghz WiFi. Increase the volume of your phone and get your phone close to the camera
6. Tap "Next". It will take a few seconds for the App to connect the camera to the WiFi via sound wave. You will hear a Ding-dong sound then "Camera ready"
You can connect the camera before mounting it on your ceiling. After re-powering it on within WiFi distance, it will take minutes to re-connect to the WiFi automatically.
Why is the image delayed or the camera disconnected?
Please make sure the WiFi signal nearby the camera is strong enough & Your WiFi is not a slow network.
Note:
The monitoring image is transferred in P2P mode, won't be stored on any server.
Any issue please don't hesitate to CONTACT US:
bonnie@timeownercorp.com
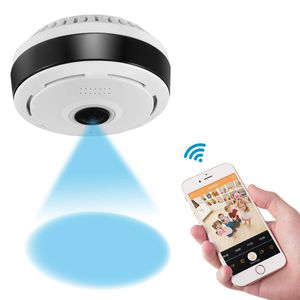
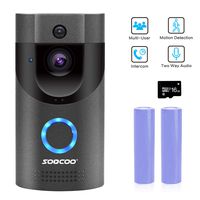
360 Degree Panoramic Camera WiFi Indoor IP Camera with Clear Night Vision 2-way Audio Motion Detection 960P Home Security Camera System for Baby Kids with iOS/Android APP for Remote Monitoring
Current Price
$39.98
Average
$39.65
Min Price
$36.98
Max Price
$45.98
Price dynamics
1%
Description
Requirements Before connecting the camera to the network
For Yourself:
You should know how to set your WiFi name (SSID) and password in your router settings.
For the Network:
1. If your router provides dual band WiFi, please make the name of 5Ghz WiFi different from that of 2.4Ghz WiFi
2. The 2.4Ghz WiFi name and password should not contain special character
3. The 2.4Ghz WiFi name should not be hidden
For the Camera:
1. It needs to be plugged in to work
2. It should be installed within WiFi distance to avoid connecting issues or unsmooth image
Steps to connect it to the network:
1. Make your WiFi meets the requirements above and the camera installed within WiFi distance
2. Power on the camera. Put the pin into the reset hole. Long press it for seconds until the camera makes a short beep. The red indicator will blink
3. Connect your phone to the 2.4Ghz band WiFi. Download the specified App. Sign up by an email address and log in
4. Click + then choose "Smart wireless mode". If the red indicator on the camera is blinking, tap "Next"
5. Enter the password for the 2.4Ghz WiFi. Increase the volume of your phone and get your phone close to the camera
6. Tap "Next". It will take a few seconds for the App to connect the camera to the WiFi via sound wave. You will hear a Ding-dong sound then "Camera ready"
You can connect the camera before mounting it on your ceiling. After re-powering it on within WiFi distance, it will take minutes to re-connect to the WiFi automatically.
Why is the image delayed or the camera disconnected?
Please make sure the WiFi signal nearby the camera is strong enough & Your WiFi is not a slow network.
Note:
The monitoring image is transferred in P2P mode, won't be stored on any server.
Any issue please don't hesitate to CONTACT US:
bonnie@timeownercorp.com
For Yourself:
You should know how to set your WiFi name (SSID) and password in your router settings.
For the Network:
1. If your router provides dual band WiFi, please make the name of 5Ghz WiFi different from that of 2.4Ghz WiFi
2. The 2.4Ghz WiFi name and password should not contain special character
3. The 2.4Ghz WiFi name should not be hidden
For the Camera:
1. It needs to be plugged in to work
2. It should be installed within WiFi distance to avoid connecting issues or unsmooth image
Steps to connect it to the network:
1. Make your WiFi meets the requirements above and the camera installed within WiFi distance
2. Power on the camera. Put the pin into the reset hole. Long press it for seconds until the camera makes a short beep. The red indicator will blink
3. Connect your phone to the 2.4Ghz band WiFi. Download the specified App. Sign up by an email address and log in
4. Click + then choose "Smart wireless mode". If the red indicator on the camera is blinking, tap "Next"
5. Enter the password for the 2.4Ghz WiFi. Increase the volume of your phone and get your phone close to the camera
6. Tap "Next". It will take a few seconds for the App to connect the camera to the WiFi via sound wave. You will hear a Ding-dong sound then "Camera ready"
You can connect the camera before mounting it on your ceiling. After re-powering it on within WiFi distance, it will take minutes to re-connect to the WiFi automatically.
Why is the image delayed or the camera disconnected?
Please make sure the WiFi signal nearby the camera is strong enough & Your WiFi is not a slow network.
Note:
The monitoring image is transferred in P2P mode, won't be stored on any server.
Any issue please don't hesitate to CONTACT US:
bonnie@timeownercorp.com
Price will be lower
in next 2 weeks
in next 2 weeks
According to the data, price will be lower in next two weeks, so not waste your money and track better price!
Product review & video
[Music] hi there today I'm unboxing of Wi-Fi light bulb which has a security camera built-in so this light bulb retails at around 90 pounds and I saw it on offer for 35 pounds so I thought I'd give it a go so let me quickly show you around the actual packaging you get some details on there nicely packaged so it's got push notifications on there there's a video formats Wi-Fi protocol local storage maximum support is 128 gig has a inbuilt microphone and speaker and night vision as well okay let's have a look okay that's it nothing more than that show let's open it up nice plain packaging on there nothing too fancy open it up and see what we get so a quick installation user manual with a QR code must be for the software so the resolution from what I read on this is 960 P gives you like a 360 degree sort of fishbowl sort of angle so if you place it in your light fitting at the top of the ro


Similar products
